とりあえずこれをやってみる。
difftasticを使う
インストール
Installationを参考に。
$ brew install difftastic
Gitで使う
Gitを参考に。
~.gitconfigに以下を追加する。
[diff]
        tool = difftastic

[difftool]
        prompt = false

[difftool "difftastic"]
        cmd = difft "$LOCAL" "$REMOTE"

[pager]
        difftool = true
上記までで、git difftoolを利用できるようになる。
さらに、なんらか好みのエイリアスを設定するとよい。
RustCoderをやる
zenn.dev 上記を実施してみたので、その際のメモ書きを残す。
インストール
私の場合はMacOSだったので、以下のコマンド。
$ curl --proto '=https' --tlsv1.2 -sSf https://sh.rustup.rs | sh
インストールすると、シェルを再起動するか、sourceを実行するかを促される。
$ source "$HOME/.cargo/env"
ここまでできれば、インストールされていることを確認する。
❯ rustup --version
rustup 1.26.0 (5af9b9484 2023-04-05)
info: This is the version for the rustup toolchain manager, not the rustc compiler.
info: The currently active `rustc` version is `rustc 1.74.1 (a28077b28 2023-12-04)`

❯ rustc --version
rustc 1.74.1 (a28077b28 2023-12-04)

❯ cargo --version
cargo 1.74.1 (ecb9851af 2023-10-18)
cargo
パッケージの作成
❯ cargo new hello_world
     Created binary (application) `hello_world` package
パッケージを作成すると、指定した名称のディレクトリ(今回はhello_worldディレクトリ)が作成され、さらにその中にsrcディレクトリも作成される。
srcディレクトリには、main.rsというソースファイルも生成され、お馴染みのHello, worldプログラムが記述されている。
ビルド
❯ cargo build
   Compiling hello_world v0.1.0 (/Users/user/dev/hello_world)
    Finished dev [unoptimized + debuginfo] target(s) in 2.95s
実行
ビルドすると、新たにtargetディレクトリが作成され、その中に実行ファイルが作成される。
❯ target/debug/hello_world
Hello, world!
ビルドと実行を同時に
❯ cargo run
    Finished dev [unoptimized + debuginfo] target(s) in 0.00s
     Running `target/debug/hello_world`
Hello, world!
rust-analyzer
VSCodeの場合、rust-analyzerをインストールすると色々捗るみたい。
バージョン管理について
Atcoderでは各言語ごとに利用されているバージョンがあるので、自分の環境とAtcoderの環境を合わせる必要がある。
以下のコマンドを実行することで任意のRustバージョンを利用できる。この記事執筆時点では1.70.0がAtcoderの環境だったので、とりあえずそれに合わせておく。
(多分パッチバージョン程度であればずれていてもそこまで大きな問題は生じないとは思う)
❯ rustup toolchain install 1.70.0
❯ rustup default 1.70.0
❯ rustc --version
rustc 1.70.0 (90c541806 2023-05-31)
ちなみに、ローカルにインストールされているRustのバージョンは以下のコマンドで確認できる。
❯ rustup toolchain list
stable-x86_64-apple-darwin (default)
1.70.0-x86_64-apple-darwin
終わり
とりあえず、環境構築は何も問題なく終わり。特に何も問題なし。
git pullなどをすると認証を要求されるようになってしまった
解決方法
Git に GitHub の認証情報をキャッシュする - GitHub Docs
上記の通り、git-credential-managerをインストールし、Github Mobile上で承認したところコマンドラインからGitHubアクセスしても認証が不要になった。
原因がよくわかっていないがとりあえずこれでよしとする。
Could not find org.springframework.boot:spring-boot-starter-data-jpa
解決方法
大抵の場合build.gradleへの記載が漏れていることに起因すると思うが、今回はバージョンを指定することで解決した。($springBootVersionは、gradle.propertiesファイルに定義する)
implementation "org.springframework.boot:spring-boot-starter-data-jpa:$springBootVersion"
- 依存関係のバージョンを指定しない(このような時、Gradleは最新バージョンで解決しようとする)
- 現在の環境で利用しているSpring Bootなどのバージョンが古い
場合に起こりうると思う(未確認)。要は、最新バージョンとプロジェクトで利用しているバージョンで差異があると何らか問題を引き起こしそう、ということ。
一言
バージョンは常に指定した方が良い
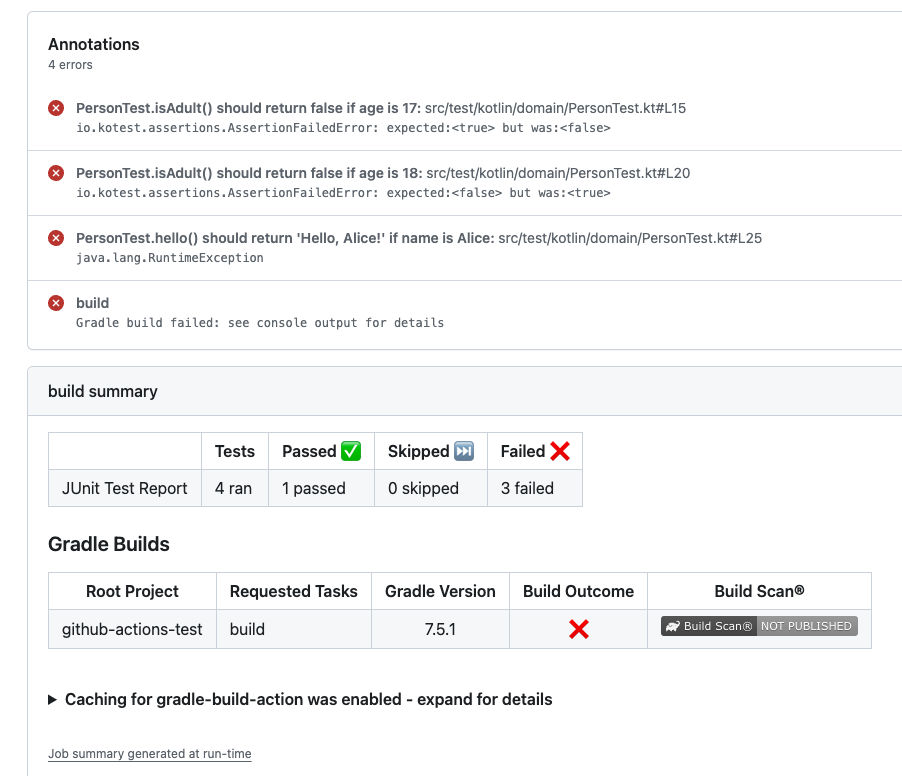
Github Actionsのテスト実行結果(Junit)をレポート出力する
結論
以下をワークフローに追加する。
      - name: publish test report
        if: cancelled() != true
        uses: mikepenz/action-junit-report@v4
        with:
          report_paths: '**/build/test-results/*/TEST-*.xml'
以下のような結果がactionsに出力される。
一言
便利
Github Actionsで実行するテストがtoo many connectionsで落ちる
解決策
MySQLデータベースのコネクション最大数を増やす
- name: Set max_connections
   run: |
      mysql -h127.0.0.1 -P3316 -u root -p${{ secrets.STG_TEST_DB_PASS }} -e "SET GLOBAL max_connections = 1000;"
補足
-v ${{ github.workspace }}/db/conf/custom.cnf:/etc/mysql/conf.d/custom.cnf
servicesの定義でMySQLデータベースを実行する際に、上記のオプションはつけていたものの、custom.cnfに記述している設定値が反映されなかった。この件についてはまた別途調査が必要かもしれない。
なお、/db/conf/custom.cnfに書いている設定自体はローカルで起動するdockerには反映されていることから、ファイル自体は間違っていないように思える。GithubActionsのランナーはうまくファイルを読み込めないなどのことがあるうるのかもしれない。